Wordpress
Wordpress is the most known blog sofware, written in PHP. We have to distinguish two sites where we can browse information:
- www.wordpress.org : scripts and the software to download.
- www.wordpress.com : a site to create your blog.
'Blog' means 'web log' (in catalan: bitàcora). Log="registre".
Contingut
Wordpress quick reference[modifica]
Some tricks to quick edit your wordpress:
- Main config file: wordpress/wp-config.php (not created by default).
- Admin panel: http://yourdomain.com/wordpress/wp-admin
- Link to subscribe RSS feed: (in the target website)
- http://domain.com/wordpress/?feed=rss
- Plugin directory: wordpress/wp-content/plugins
- Skin directory: wordpress/wp-content/themes
- Widgets: amdin panel -> Appearance -> Widgets
Blog contents[modifica]
The main contents in WP are:
- Posts: the essential blog articles in a timeline basis. They can be categorized (classified) and reviewed by date.
- Links: to link to other related pages. Really imporant to make social network and increase positions in the search engines.
- Pages: classical web pages (also with media contents).
Using extensions we can have additional information and data into the blog such as YouTube videos, maps, RSS, etc.
WP structure[modifica]
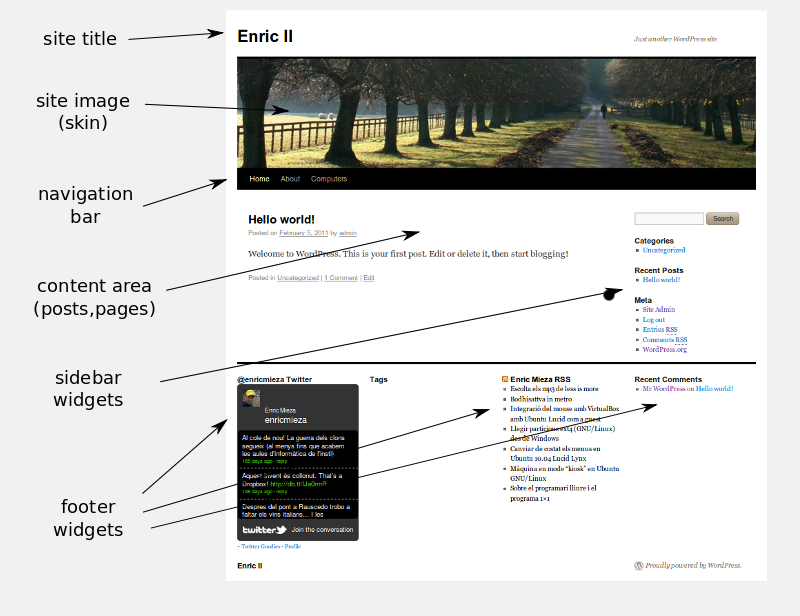
Wordpress has different structure depending on the skin. But generally we use to have:
- Theme image and blog title in the top.
- Navigation bar over or under the image: selector for blog (home) and pages.
- Content area in the center (blog or page).
- Sidebar widgets.
- Footer widgets (4 areas, just after 3.x versions).
Widgets (Ginys)[modifica]
There are several content that we can put in small boxes in the sidebar and footer: the widgets. The most important are:
- RSS feed: you can syndicate and embed contents (posts or news) from other websites that are updated automatically. Read about it in Wikipedia.
- Text: a text box with whatever you want. Static content.
- Calendar: appears a calender with your blog activity (if you want to put events you have to install a scheduler extension).
- Tag Cloud: a cloud with the keywords of your site.
- Categories: lets you browse your posts by category.
- Links
- Pages
- Archives
You can add other widgets by installing extension such as:
- Twitter Goodies: connects to your twitter posts.
- Stout Google Calendar: lets you show Google Calendar information.
- ...
To add a widget just go to the admin menu and Appearance -> Widgets. You have several positions to place the boxes:
- Sidebar (may have 1 or 2 bars)
- Footer: 3-4 columns (just in some themes as the default twenty ten).
- If your theme doesn't have footer widgets you can follow this article to add footer widgets to your skin.
Installing wordpress[modifica]
As in many CMS the procedure to install WP is:
- Download tarball (or zip or subversion check-out), preferably latest version from www.wordpress.org
- Unpack all the contents of the package.
- Rename the WP root directory (initially "wordpress" but you may prefer another name).
- Upload the entire directory to the public_html folder on your server (via FTP using Filezilla and taking care of changing max number of "simultaneous file transfers" to 5, otherwise it will take a long time to finish). If you are working with a SSH connection directly into the server you don't need this step.
- Create database (and maybe new user too) in the server. Remember user and password of your DB user and DB name.
- Copy or move the file wp-config-sample.php into wp-config.php
- Edit wp-config.php and configure the parameters to suit your system.
- Upload wp-config.php to the server if you are not working directly on server.
- Point your browser to the root of your installation and follow instructions: TAKE CARE REMEMBERING ADMIN USER AND PASSWORD!
- Go to the admin panel and start configuring WP.
Themes (Skins)[modifica]
The usual manual procedure to install a new theme/skin is:
- Download and unpack the tarball package in your local machine.
- Upload files via FTP to your server to the wordpress/wp-content/plugins directory.
- Go to the admin panel in wordpress/wp-admin, section Appearance -> Themes.
- Select your skin from the list.
- Customize image, logo, etc. in section Appearance -> Theme Options.
- Customize CSS to fit the final result.
Pay attention in the Theme Options, it is quite common to need to tune the CSS to fit the logo/title and/or other content to be modified. You can use the box at the end to add CSS code inCustom CSS, instead of modifying the skin files (this way you can keep a safe version of your skin).
The options available under that "Theme Options" menu depends on each skin.
Installing plugins[modifica]
The usual manual procedure is:
- Download and unpack the tarball package in your local machine.
- Upload files via FTP to your server to the wordpress/wp-content/plugins directory.
- Go to the admin panel in wordpress/wp-admin, section Extensions
- Activate your extension.
[modifica]
That's an advanced hack, is good to have a copy of a not-modified skin just in case something goes wrong and cannot go back.
The procedure is described in that article. Anyway, we have to add some things to make it work.
- Change permission to 666 (write-enable to all users) to the following files:
- style.css
- functions.php
- footer.php
- Go to theme editor: Appearance -> Edit
- Modify the files as described in this article.
- Take care when editing footer.php. It will appear 3 blocks (as many as columns we want) like this one:
<div id="footer-sidebar1">
<?php if ( !function_exists('dynamic_sidebar') || !dynamic_sidebar(3) ) : ?>
<?php endif; ?>
</div>
Take care in the marked line with the funcion dynamic_sidebar(3). The name has to be correlated with our sidebar number. The example in the article supposes you just have 1 single sidebar and the numbers for the dynamic_sidebar are 2, 3 and 4. If we have 2 sidebars the numbers will have to be 3, 4 and 5.
